In today’s fast-paced and security-conscious world, small business owners are increasingly turning to advanced surveillance systems to protect their premises, assets, and employees. With the advent of technology, installing a multi-camera CCTV system has become more accessible and affordable than ever. Moreover, modern systems offer the flexibility of remote viewing on smartphones, ensuring you can keep an eye on your business even when you’re away.
This article will take you step by step through the process from planning and equipment selection to installation, configuration, and troubleshooting so you can set up a robust CCTV system that meets your small business needs.
Understanding Multi-Camera CCTV Systems
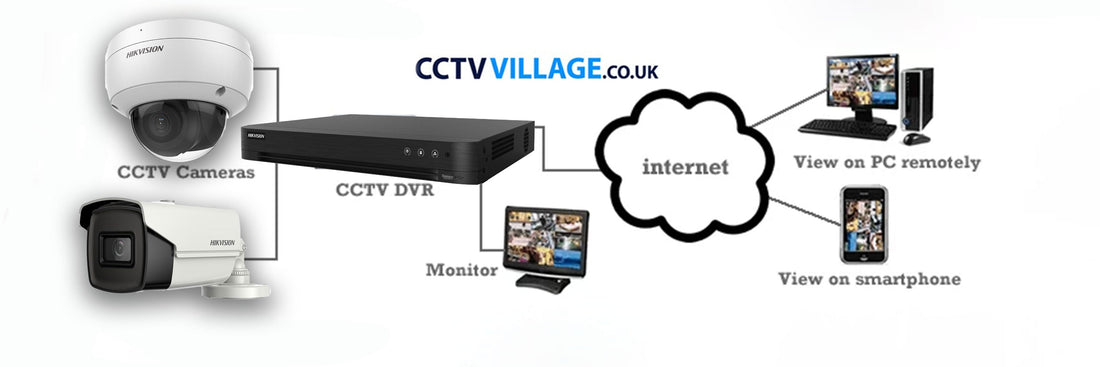
Before diving into installation, it’s essential to understand what a multi-camera CCTV system entails. A multi-camera system uses several cameras placed at strategic points around your business premises to provide comprehensive coverage. These cameras are linked to a central recording device (often a Network Video Recorder or DVR/NVR) that stores footage. Additionally, modern systems are designed to connect to your local network or the internet, allowing you to monitor the feed from a smartphone or other remote device.
Key components include:
- Cameras: These can be dome, bullet, or PTZ (pan-tilt-zoom) models, each suited to different surveillance needs.
- Recording Device: This could be a DVR (Digital Video Recorder) for analog cameras or an NVR (Network Video Recorder) for IP cameras.
- Storage: Hard drives or cloud storage solutions where video footage is saved.
- Cabling and Mounts: Necessary for powering the cameras and transmitting data.
- Network Infrastructure: Routers, switches, and sometimes wireless access points to connect the system to the internet.
- Remote Viewing Software/Apps: Applications that allow you to access live or recorded footage on your smartphone.
Understanding these elements will help you make informed decisions throughout the installation process.
Planning Your CCTV Installation
Proper planning is the cornerstone of a successful CCTV installation. Start by asking yourself several key questions:
- What areas require coverage? Identify entry points, high-traffic zones, and any vulnerable areas.
- How many cameras are needed? Based on the layout and size of your property, decide on the number of cameras to ensure comprehensive coverage.
- What type of cameras suits your needs? Outdoor cameras with weatherproof features may be needed for exterior areas, while indoor cameras might prioritize high resolution and discreet design.
- How will the system be connected? Decide whether to use wired or wireless cameras. While wireless systems offer easier installation and flexibility, wired systems generally provide a more reliable and secure connection.
- What is your budget? Balance your security needs with available funds. Consider both upfront costs and long-term maintenance expenses.
Once you have answered these questions, create a detailed floor plan or site map of your business. Mark the potential camera positions, the location of the recording device, and where network equipment will be installed. This visual guide will serve as your roadmap during installation.
Choosing the Right Equipment
Cameras
When selecting cameras, keep the following in mind:
- Resolution: Higher resolution cameras (1080p or above) offer clear, detailed images.
- Field of View: Wide-angle lenses capture more area, reducing the number of cameras needed.
- Night Vision: Infrared (IR) technology ensures clear images even in low-light conditions.
- Weather Resistance: For outdoor cameras, ensure they are rated for the environmental conditions they will face.
Recording Devices
Decide between a DVR and an NVR:
- DVR: Typically used with analog cameras, these systems are simpler to set up but may lack the advanced features of IP-based systems.
- NVR: Suitable for IP cameras, these systems offer higher image quality, remote accessibility, and often support additional features like motion detection and advanced analytics.
Storage Options
Video storage is a critical component:
- Local Storage: Hard drives installed in the recording device offer quick access but may be limited in capacity.
- Cloud Storage: Provides remote access and redundancy but often comes with recurring subscription costs.
Networking Gear
For remote viewing, a stable and secure network connection is vital:
- Router/Switch: Ensure you have a robust router or network switch that can handle multiple devices.
- Cabling: If using a wired system, quality Ethernet cables (preferably Cat6 or higher) are necessary to ensure reliable connectivity.
- Wireless Access Points: For wireless cameras, ensure that your Wi-Fi network has sufficient range and speed.
Power Supply
Decide on the power solution:
- Direct Wiring: Hardwired cameras may require professional installation of power outlets.
- PoE (Power over Ethernet): This technology combines power and data transmission over a single cable, simplifying installation.
- Battery-Powered Options: Some modern cameras operate on batteries, reducing the need for extensive cabling but requiring regular maintenance.
Preparing for Installation
Preparation is key to a smooth installation. Here are some steps to get ready:
- Survey the Site: Walk around your business to identify optimal camera locations. Check for obstructions, lighting conditions, and potential points of interference.
- Gather Tools and Materials: Ensure you have all necessary tools such as drills, screwdrivers, cable testers, and ladder stands. Also, prepare the cables, mounts, and connectors.
- Plan the Wiring: If you’re installing a wired system, plan the cable runs. Consider the length of each run and the best route to minimize damage and interference.
- Network Considerations: Make sure your network is robust. Test your Wi-Fi signal strength and, if needed, invest in range extenders or additional access points.
- Safety Measures: Always follow safety guidelines when working at heights or with electrical components. Use proper protective equipment and secure ladders.
Step-by-Step Installation Guide
1. Install the Cameras
Mounting the Cameras:
- Determine Placement: Using your site survey, mark the positions on walls or ceilings where cameras will be installed. Ensure these spots offer a clear line of sight and cover the desired area.
- Drill and Secure Mounts: Carefully drill holes in the marked locations. Secure the camera mounts with appropriate anchors and screws to ensure stability.
- Attach the Cameras: Once the mounts are in place, attach the cameras securely. Adjust their angles to cover the intended area effectively.
Wiring and Powering the Cameras:
- For Wired Systems: Run the Ethernet or coaxial cables along the predetermined paths. Use cable clips or conduits to secure the wiring neatly and safely. Connect the cables to both the cameras and the recording device.
- For PoE Systems: Connect the cameras to PoE switches or injectors. This setup allows the same cable to provide both data and power.
- Testing the Connection: After wiring, test each camera to ensure it powers up and transmits a signal. Use a monitor or the recording device’s interface for this purpose.
2. Set Up the Recording Device
Choosing the Installation Location:
- Central Location: Place the DVR/NVR in a secure, central location where cables can reach all cameras. Ensure the device is in a cool, dry environment to prevent overheating.
- Connecting Cables: Connect the cables from each camera to the recording device. Follow the device’s manual for proper port assignment.
Configuring the Device:
- Initial Setup: Power on the device and follow the on-screen setup wizard. Configure basic settings such as time zone, date, and network parameters.
- Storage Setup: Format the hard drive and set up storage parameters. Configure the device to overwrite old footage once the disk is full, or set up alerts for when storage is low.
- Network Configuration: Assign an IP address to the device. For remote access, ensure it’s either on a static IP or set up a dynamic DNS (DDNS) service to track changes in your public IP.
3. Integrate Remote Viewing Capabilities
Remote viewing is one of the most powerful features of modern CCTV systems. Here’s how to set it up:
Software and App Installation:
- Choose the Right App: Most CCTV manufacturers offer dedicated smartphone apps for remote viewing. Download the app recommended for your system from your smartphone’s app store.
- Install on Your Smartphone: Once downloaded, install and open the app. Follow the initial setup instructions, which usually involve creating an account and linking the app to your recording device.
Configuring Remote Access:
- Connect to the Recording Device: Use the device’s IP address, along with any required username and password, to link the app to your system. Some apps offer a QR code for quick configuration.
- Set Up Alerts and Notifications: Many systems allow you to configure motion detection alerts. Enable these features so you receive push notifications on your smartphone whenever movement is detected.
- Test the Connection: Verify that you can view live footage and access recorded files from your smartphone. Troubleshoot any connectivity issues by checking your network settings or consulting the device’s manual.
4. Secure Your System
Security is paramount for any surveillance system, especially when remote access is involved. Take the following steps to safeguard your system:
Network Security:
- Use Strong Passwords: Change the default passwords on both the recording device and the app. Use a combination of upper- and lower-case letters, numbers, and symbols.
- Enable Encryption: If your system supports it, enable data encryption to protect the video feed from potential interception.
- Update Firmware Regularly: Manufacturers often release firmware updates that address security vulnerabilities. Regularly check for updates and install them promptly.
Physical Security:
- Secure the Recording Device: Place the DVR/NVR in a locked room or cabinet to prevent tampering.
- Cable Protection: Secure cables and run them in concealed or secure conduits to prevent unauthorized access or damage.
5. Troubleshooting and Maintenance
No installation is complete without considering maintenance and troubleshooting protocols. Here are some tips:
Common Issues and Solutions:
- Connectivity Problems: If a camera loses connection, check the cable or wireless signal. For wired cameras, use a cable tester to confirm integrity. For wireless setups, ensure the camera is within range of the access point.
- Poor Image Quality: Adjust the camera’s focus, reposition the lens, or update the camera’s firmware. Also, verify that the resolution settings in your recording device match the capabilities of the camera.
- Power Failures: Ensure that all connections are secure and that power supplies or PoE injectors are functioning. Consider a backup power solution, such as an uninterruptible power supply (UPS), to keep your system running during outages.
Regular Maintenance:
- Clean the Cameras: Dust and debris can impair image quality. Schedule regular cleaning for camera lenses and housings.
- Check Storage Capacity: Monitor the storage device’s capacity to ensure it isn’t overwhelmed with data. Regularly back up important footage.
- Software Updates: Periodically update the mobile app and recording device firmware to maintain optimal performance and security.
Best Practices for a Successful Installation
A few best practices can make the difference between a functional system and a flawless security solution:
- Plan Thoroughly: Invest time in the planning phase to avoid costly mistakes during installation. A well-thought-out layout can save time and resources later.
- Invest in Quality Equipment: While budget considerations are important, quality equipment ensures durability, reliability, and ease of use.
- Prioritize Network Stability: A strong network connection is the backbone of remote viewing capabilities. Ensure your business network is robust and secure.
- Document the Setup: Keep records of the installation, including camera locations, IP addresses, and wiring diagrams. This documentation is invaluable for troubleshooting and future upgrades.
- Train Staff: Educate key staff members on how to operate the system and respond to alerts. A knowledgeable team can enhance overall security.
The Benefits of Remote Viewing for Small Businesses
One of the most significant advantages of modern CCTV systems is the ability to view surveillance footage remotely on your smartphone. Here’s why this feature is a game-changer for small businesses:
Increased Flexibility:
You no longer need to be physically present to monitor your business. Whether you’re traveling or working from home, remote viewing allows you to stay connected and vigilant.
Real-Time Alerts:
Many systems now include motion detection and other advanced analytics. When unusual activity is detected, you receive immediate notifications on your smartphone, enabling a swift response.
Enhanced Security:
Remote access can deter potential criminals, as they may be aware that your premises are under constant surveillance. Additionally, being able to view live footage helps you verify incidents in real time, providing evidence that can be critical in legal or insurance situations.
Ease of Use:
Modern apps are user-friendly, allowing even non-technical users to navigate live feeds, review recorded footage, and manage system settings with ease. This simplicity ensures that small business owners can maintain an effective surveillance system without needing extensive technical support.
Final Thoughts
Installing a multi-camera CCTV system with remote viewing capabilities on your smartphone is an empowering way to secure your small business. By investing in the right technology, planning your installation carefully, and following best practices, you can create a surveillance system that not only deters potential criminal activity but also provides you with peace of mind knowing that your business is always within reach, no matter where you are.
Whether you opt for a wired or wireless system, traditional DVR-based solutions or advanced NVR systems, the principles remain the same: assess your needs, choose quality components, install carefully, and keep security at the forefront. With the step-by-step approach outlined in this article, you’re well-equipped to undertake this project and safeguard your investment effectively.
As technology evolves, so too will the features available in CCTV systems. Today’s solutions already offer robust capabilities, but tomorrow’s advancements promise even greater flexibility, higher resolution, and enhanced analytics. Staying informed and proactive about updates and industry trends can help ensure your surveillance system remains state-of-the-art and continues to meet the growing demands of modern security.
In summary, here are the key steps to remember:
- Understand the Components: Familiarize yourself with the various parts of a multi-camera system and how they work together.
- Plan Meticulously: Develop a detailed layout of your business, highlighting areas requiring surveillance and mapping out cable routes or wireless coverage.
- Select High-Quality Equipment: Choose cameras, recording devices, storage solutions, and networking hardware that align with your business needs and budget.
- Follow a Systematic Installation Process: From mounting cameras and running cables to configuring your recording device and setting up remote viewing, each step is crucial for a reliable installation.
- Prioritize Security and Maintenance: Secure both the physical components and digital access points of your system, and schedule regular maintenance to ensure optimal performance.
By following these guidelines, you can create a CCTV system that not only monitors your business effectively but also gives you the freedom to manage your security remotely anytime, anywhere.
The initial effort may seem significant, but the long-term benefits of enhanced security, operational flexibility, and peace of mind are well worth the investment. Whether you’re new to surveillance technology or looking to upgrade your existing system, these insights offer a clear roadmap to success.
Additional Tips for Small Business Owners
- Consult a Professional: If you’re unsure about any part of the installation, don’t hesitate to consult with a security professional. They can provide valuable advice and even assist with the installation.
- Budget for Upgrades: Technology changes rapidly. Plan for periodic upgrades to your system to keep up with the latest advancements in camera resolution, storage solutions, and remote access features.
- Consider Scalability: Choose a system that can grow with your business. As your security needs expand, it should be easy to add more cameras or integrate additional functionalities.
- Regularly Review Footage: Make it a habit to review recorded footage periodically. This not only helps in verifying the system’s operation but can also alert you to any potential blind spots or areas that might need additional coverage.
Conclusion
A multi-camera CCTV system with remote viewing capabilities is an essential investment for any small business owner aiming to secure their premises and assets. With careful planning, the right tools, and a clear installation process, you can set up a reliable system that keeps you connected and informed at all times.
From selecting the best cameras and recording devices to configuring a secure network and enabling smartphone access, every step plays a crucial role in the success of your security system. With this comprehensive guide, you’re now equipped to install a robust surveillance solution that will serve your business for years to come.
By investing in advanced security technology, you’re not only protecting your property but also demonstrating a commitment to safety that can reassure employees, customers, and partners alike. The ability to monitor your business remotely provides invaluable flexibility, allowing you to respond promptly to any suspicious activity and maintain control no matter where your day takes you.
Implement these strategies and best practices to ensure your multi-camera CCTV system works seamlessly. As you secure your premises, you’re taking an important step towards creating a safer and more resilient business environment. With the power of remote viewing on your smartphone, you’re always just a tap away from keeping your business secure.